Keys to Your Jig Fishing Success
By Russ
Bassdozer
Foreword
Chapter One.
In Chapter One, we learn of the importance of jig color
selection.
Chapter Two.
We learn when to use a flipping head, football head and weedless
Arkie style jig head, plus how to trim a fiberguard.
Chapter Three.
There's no stopping us as we go on to learn how to use double
tail grubs as jig trailers.
Chapter Four.
We continue our jig fishing education with a discussion of skirt
types and how to trim silicone and rubber skirts.
Chapter Five.
We get into a pork talk reviewing all you need to know about pork
trailers.
Learn to jig. It's hard work but rewarding.
It's the sign of a master angler.
Jigs need trailers. For most of the season, a
double tail grub trailer usually works best for me, and a
crawfish trailer works well too. Try them both. Some experts
still prefer pork frog chunks, but most anglers find them
bothersome to deal with and store. Plastic versions of pork
chunks are a popular choice due to convenience in storing them.
The same effect as a plastic chunk can be achieved by trimming
the tips of a double tail grub so they are straight rather than
curly. You can see examples of how to trim them in the attached
photo. Sometimes fish want this straight-legged trailer
especially during winter, early spring or late fall when water
temperatures make fish feel lethargic. In cold water, they prefer
their meals to look as lethargic as the bass feels.
Color is an important issue. First, there is the
skirt color. Solid black, black/red, black/blue, brown,
brown/orange, and dark watermelon skirts are staples.
Black/chartreuse gets the nod in the dingiest of water or at
night, and a purple skirt is also good in dark water or at night.
Next is the trailer color:
-
A big black trailer on a purple jig at night.
-
On brown jigs, a purple/blue flake trailer (164),
smoke/purple flake (157), brown grape (198) or cinnamon/purple
flake(221), smoke/copper flake (163), smoke pearl blue (240), or
watermelon pepper (297).
-
On black jigs, watermelon/red flake (208),
black/red flake (051), black/blue flake (021), black/blue tip
(520), or black/red tip (521).
-
In the darkest water, try a black/chartreuse
skirt with a big smoke pearl blue (240) or tomato pepper (155)
trailer.
Jig weight is important too. A 1/4 oz jig can be
used in the very shallowest of water, but the most common sizes
are 3/8 and 1/2 oz for water from 3 to 10 feet deep. A 5/8 or 3/4
oz jig can get you down to the bottom in 20 to 30 feet of water,
which is usually the lower limit for jig fishing. Regardless of
depth, you need to be contacting some sort of cover with a jig.
Don't fear losing it, that's why it has the fiberguard.
Keys to Your Jig Fishing
Success
Chapter 2
The Head and Fiber Guard
Flippin' Head - Series 67
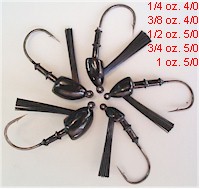 The
Flippin' Head has an extremely strong hook for the biggest bass
in the thickest weed and brush cover. The hook is thick high
carbon steel, forged, needle sharp and suited for the heaviest
baitcasting rod, reel and line. The hook is custom designed by
Gary and made only for him by Gamakatsu. The head shape is custom
designed by Gary to get in and out of brush and weeds, but NOT
out of a fish's mouth without hooking it! As for tactics, use a
heavy enough size to plummet through brush tops or break through
the leafy upper parts of grass beds. In heavy brush or matted
weeds, use the heaviest weights, and lighten up the weight for
thinned-out cover. Depth of the water may have little to do with
the size weight you need. For example, you might need a heavy 1
oz. to break through heavy matted weeds and pad-choked shallows
in 6 feet of water whereas a lighter 1/2 oz. may be fine to
jiggle through sparse brush in 15 feet of water, okay? You
usually want to get your jig underneath the brushy or leafy zone.
Underneath, there are open areas of only weed stalks or brush
trunks - not leaves or branches like the upper layer of the
cover. This open underwater area below the brush tops and weed
mats is used by bass and forage species. With weeds, you may have
several feet of open water under the mats. With brush, you often
only have a foot or two of open water near the base of the trunk.
Bass set up shop at the base of the trunk where they lie in
ambush under the overhanging eaves of the brush. Your jig needs
to get down to the open water under the branches - usually right
on bottom - for best results. You will need heavy gear and strong
line for this, and it is often best to move the boat in to get a
big bass out rather than trying to pull the bass to you through
all that grass and brush. This is an extreme but deadly form of
fishing! The
Flippin' Head has an extremely strong hook for the biggest bass
in the thickest weed and brush cover. The hook is thick high
carbon steel, forged, needle sharp and suited for the heaviest
baitcasting rod, reel and line. The hook is custom designed by
Gary and made only for him by Gamakatsu. The head shape is custom
designed by Gary to get in and out of brush and weeds, but NOT
out of a fish's mouth without hooking it! As for tactics, use a
heavy enough size to plummet through brush tops or break through
the leafy upper parts of grass beds. In heavy brush or matted
weeds, use the heaviest weights, and lighten up the weight for
thinned-out cover. Depth of the water may have little to do with
the size weight you need. For example, you might need a heavy 1
oz. to break through heavy matted weeds and pad-choked shallows
in 6 feet of water whereas a lighter 1/2 oz. may be fine to
jiggle through sparse brush in 15 feet of water, okay? You
usually want to get your jig underneath the brushy or leafy zone.
Underneath, there are open areas of only weed stalks or brush
trunks - not leaves or branches like the upper layer of the
cover. This open underwater area below the brush tops and weed
mats is used by bass and forage species. With weeds, you may have
several feet of open water under the mats. With brush, you often
only have a foot or two of open water near the base of the trunk.
Bass set up shop at the base of the trunk where they lie in
ambush under the overhanging eaves of the brush. Your jig needs
to get down to the open water under the branches - usually right
on bottom - for best results. You will need heavy gear and strong
line for this, and it is often best to move the boat in to get a
big bass out rather than trying to pull the bass to you through
all that grass and brush. This is an extreme but deadly form of
fishing!
Weedless Football Head - Series 44W
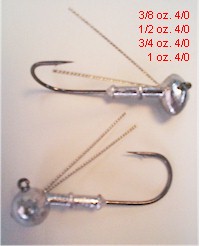 The
Weedless Football Head has an extremely strong, high carbon
steel, forged hook and a stout wireguard cable suited to heavy
rods, reels and line. The hook is custom designed by Gary and
made only for him by Gamakatsu. The head shape is designed by
Gary to make constant contact with rock rubble, chunk rock or
gravel bottoms. The round face rolls the jig forward, flipping
the skirt and trailer up as the head drags across hard bottom.
The wide football shape resists getting lodged too deeply into
cracks between rocks, and the wireguard ensures that only the
head - but not the hook - gets lodged. You can usually position
your boat right over a snagged football head, jiggle it and
dislodge it due to the protective wireguard. However, a fish will
easily depress the wireguard in its mouth, exposing the needle
sharp point. It seems that airborne, head-shaking bass
dislodge football jigs easily when they jump, but Gary custom
designed the Gamakatsu hook in this jig to foil that ability for
bass to shake loose the heavy football heads when they jump, and
the wireguard also tends to help keep the hook from unbuttoning.
Football heads are also great for bottom-bouncing in flowing
water. The stable design of football jigs tumble less than other
jig designs in current. Cast upcurrent about 45 degrees. Let the
jig hit bottom (your line will go slack and billow), then reel in
semi-slack line so the jig barely glides above bottom, touching
down 2, 3, or 4 times before it gets perpendicular to you.
Pay particular attention when the jig gets perpendicular to
you. It does a 180 on the bottom as it begins to stem the flow.
Bass will follow your jig as it glides downcurrent and belt you
when the jig does the 180 and starts to stem the flow. The
Weedless Football Head has an extremely strong, high carbon
steel, forged hook and a stout wireguard cable suited to heavy
rods, reels and line. The hook is custom designed by Gary and
made only for him by Gamakatsu. The head shape is designed by
Gary to make constant contact with rock rubble, chunk rock or
gravel bottoms. The round face rolls the jig forward, flipping
the skirt and trailer up as the head drags across hard bottom.
The wide football shape resists getting lodged too deeply into
cracks between rocks, and the wireguard ensures that only the
head - but not the hook - gets lodged. You can usually position
your boat right over a snagged football head, jiggle it and
dislodge it due to the protective wireguard. However, a fish will
easily depress the wireguard in its mouth, exposing the needle
sharp point. It seems that airborne, head-shaking bass
dislodge football jigs easily when they jump, but Gary custom
designed the Gamakatsu hook in this jig to foil that ability for
bass to shake loose the heavy football heads when they jump, and
the wireguard also tends to help keep the hook from unbuttoning.
Football heads are also great for bottom-bouncing in flowing
water. The stable design of football jigs tumble less than other
jig designs in current. Cast upcurrent about 45 degrees. Let the
jig hit bottom (your line will go slack and billow), then reel in
semi-slack line so the jig barely glides above bottom, touching
down 2, 3, or 4 times before it gets perpendicular to you.
Pay particular attention when the jig gets perpendicular to
you. It does a 180 on the bottom as it begins to stem the flow.
Bass will follow your jig as it glides downcurrent and belt you
when the jig does the 180 and starts to stem the flow.
Weedless Jig Head - Series 66
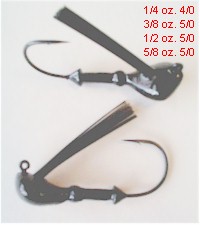 The
Weedless Jig Head has a thin yet strong high carbon steel hook by
Owner. The thin hook and needle sharp point ensures deep, fast
hook penetration using medium rods, reels and line. The head
shape is blunted to smash into and bounce over logs, stumps,
pilings, square-edged rock piles such as natural rock slides,
man-made rip rap, bridge abutments, etc. The 90 degree hook eye
also helps this head bounce off and over big stuff. This is
also a good head to glide or swim slowly just above bottom, and
it is well-designed to drag, troll or wind-drift behind the boat.
Dragging, drifting or trolling a weedless jig head is a great way
to cover large areas of water prospecting for bass that are
scattered and hard to find by casting. make sure you have enough
line out behind the boat so you feel a steady tap-tap as the jig
drags along bottom. If you feel nothing at all, let more line off
the spool because your jig is probably floating too high up off
bottom. Let line out until it billows out slack (meaning you're
back on bottom). Then engage the reel and drag it under trolling
or wind power. Often, you'll get beaucoup hits when the jig
bounces sharply off some irregular underwater cover. You're not
as likely to get hit when it drags over featureless smooth
expanses of bottom. The
Weedless Jig Head has a thin yet strong high carbon steel hook by
Owner. The thin hook and needle sharp point ensures deep, fast
hook penetration using medium rods, reels and line. The head
shape is blunted to smash into and bounce over logs, stumps,
pilings, square-edged rock piles such as natural rock slides,
man-made rip rap, bridge abutments, etc. The 90 degree hook eye
also helps this head bounce off and over big stuff. This is
also a good head to glide or swim slowly just above bottom, and
it is well-designed to drag, troll or wind-drift behind the boat.
Dragging, drifting or trolling a weedless jig head is a great way
to cover large areas of water prospecting for bass that are
scattered and hard to find by casting. make sure you have enough
line out behind the boat so you feel a steady tap-tap as the jig
drags along bottom. If you feel nothing at all, let more line off
the spool because your jig is probably floating too high up off
bottom. Let line out until it billows out slack (meaning you're
back on bottom). Then engage the reel and drag it under trolling
or wind power. Often, you'll get beaucoup hits when the jig
bounces sharply off some irregular underwater cover. You're not
as likely to get hit when it drags over featureless smooth
expanses of bottom.
Widowmaker Jigs - Series 45 & 46
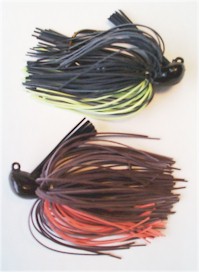 The
Widowmaker Jig features the same blunted head design and
bayonet-style collar (to hold trailers) as the Weedless Jig
above. It sports a medium wire bronzed Mustad wide gap, round
bend hook. The skirts on Widowmakers are wrapped on with
stainless wire to ensure bass will not tear them off. Series 45
sports a regular rubber skirt whereas series 46 has a fine rubber
skirt. Fine rubber, often referred to as "frog hair"
has more wriggle to it than regular rubber. Some anglers prefer
fine rubber for finesse fishing closed-mouthed bass in
ultra-clear shallow water or for winter fishing where you hardly
move the jig - just let the rubber wriggle. Colors: Black
(020), Brown (024), Brown/Orange (081), Black/Chartreuse
(066), Purple (004) The
Widowmaker Jig features the same blunted head design and
bayonet-style collar (to hold trailers) as the Weedless Jig
above. It sports a medium wire bronzed Mustad wide gap, round
bend hook. The skirts on Widowmakers are wrapped on with
stainless wire to ensure bass will not tear them off. Series 45
sports a regular rubber skirt whereas series 46 has a fine rubber
skirt. Fine rubber, often referred to as "frog hair"
has more wriggle to it than regular rubber. Some anglers prefer
fine rubber for finesse fishing closed-mouthed bass in
ultra-clear shallow water or for winter fishing where you hardly
move the jig - just let the rubber wriggle. Colors: Black
(020), Brown (024), Brown/Orange (081), Black/Chartreuse
(066), Purple (004)
Trimming Fiberguards
Something to keep in mind is that the longer your
weedguard is the more weedless it is and thus makes it harder to
hook fish. The shorter you make it the easier it is to hook fish
but also makes it easier to hang. So you have to find the middle
area where you can easily hook the fish but yet stay weedless. I
trim mine just outside the hook point and I trim it so the end of
the weed guard is parallel with the point of the hook.
I prepare a fiberguard first and foremost NOT to
hook fish. Primarily, I make the fiberguard snagless
enough to get my jig back out of some real nasty places bass
use...downed trees, drowned brush, thick matted weeds, pad beds,
pools hidden behind tall walls of reeds, craggy rocks, etc.
Hooksetting becomes a secondary consideration to me if my
jig is consistently snagged in the cover. If I have to go into
the cover to unsnag my jig, then I'm just scaring all the fish
off the cover...and wasting my time in the process! So, I
want to get my jig in AND out of cover without having to go in to
unsnag it and spook all the bass in there - that's the reason for
the fiberguard.
Ideally, you want the fiberguard to be just stiff
enough to allow you to get the jig back out of where you tossed
it. Therefore, you make the fiberguard longer, shorter, more
strands or less strands solely depending on the heaviness and
type of cover you are fishing, okay? Of course, your rod, reel
and line must also compliment the sturdiness of the fiberguard
and the cover.
Jig manufacturers don't know where or how you
will be using their jigs, so they usually make the fiberguards
extra long and extra thick so you can always cut them shorter or
thin out some of the fibers as you see fit. I kind of think of it
like when you buy a pair of dress pants. The pants legs come
untrimmed but the pants manufacturer never expects you to wear
the pants like that! No, you are expected to trim and hem the
pants to the ideal length for you. Same thing with a jig's
fiberguard! The manufacturer expects you to thin them out and
trim them down to suit yourself!
Here's how to make a jig that is just
snag-resistant enough for you to consistently get it back out of
the gnarly places you'll be throwing it:
1) Press the fibers back to measure them against
the tip of the hookpoint and shorten them with a scissors or
clippers. Never cut them shorter than just beyond the hook point.
Better to trim too little instead of too much.
2) It's hard to envision snagging the hook point
straight up dead center. Snags happen because the jig flips on
its side and gets caught. Therefore, separate the fiber bundle
into left and right halves with your fingers and spread them far
to the sides of the hookpoint. In fact, it is absolutely perfect
if the fibers form a vee well out to the sides of the hook with
no fibers at all directly in front of the hook. Not only does
this vee protect the hook from snags, but it also gives the
appearance of a crayfish brandishing its claws above its head in
a defensive posture just before it gets eaten.
3) Put your thumb behind where the fibers are
glued into the jighead. Press at the base of the fibers and push
towards the hook eye a few times until the fibers stand almost
straight up. They also fan out a bit as you do this. Overall, aim
to make at least an inch-wide safety zone as far ahead and out to
the sides of the hookpoint as possible.
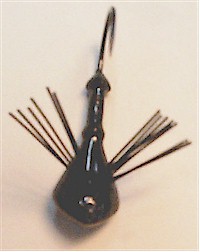 4)
Now test the snag-resistance of the fibers by pushing back on
them with your index finger. If too resistant, cut away fibers
until you achieve your desired snag-resistance, a
"feel" which only comes with experience. Cut them at
the base of the stem, where they are glued or molded into the
leadhead. You will rarely need the full 30-40 fibers the jig
comes with fresh out of the package. Rather, most cover can be
fished using 12-20 fibers. It's the pants hem thing
again...manufacturers put a lot of fibers so you can trim a few
off. Needless to say, if you are using ½ oz jigs on a pool cue
baitcaster with 80 lb. test braid, you can handle more resistance
and leave more fibers in your fiberguard than if you are using
1/4 oz jigs on 15 lb test spinning tackle. 4)
Now test the snag-resistance of the fibers by pushing back on
them with your index finger. If too resistant, cut away fibers
until you achieve your desired snag-resistance, a
"feel" which only comes with experience. Cut them at
the base of the stem, where they are glued or molded into the
leadhead. You will rarely need the full 30-40 fibers the jig
comes with fresh out of the package. Rather, most cover can be
fished using 12-20 fibers. It's the pants hem thing
again...manufacturers put a lot of fibers so you can trim a few
off. Needless to say, if you are using ½ oz jigs on a pool cue
baitcaster with 80 lb. test braid, you can handle more resistance
and leave more fibers in your fiberguard than if you are using
1/4 oz jigs on 15 lb test spinning tackle.
Keys to Your Jig Fishing
Success
Chapter 3
Double Tail Grub Trailers
Trailer Tips
Any body can be cut shorter to make a stubbier,
bulkier trailer body. You can use the 15 body to get a thin
4" trailer, cut the nose off the 16 to get a wider 4"
trailer, cut even more off the 12 or 17 bodies to get a
progressively fatter, slower-falling 4" trailer. As you add
bulk, it slows the fall of the lure and vice versa.
Tail Tips
Because many bass hit jigs as they are falling,
the fall rate is one of the most important strike-triggering
variables with which to experiment. Above, we discussed the body
bulk as one way to vary the fall. The size of the tail is a
second way. A longer, wider tail falls slower. A third way, of
course, to vary the fall rate is with different weight jig
heads. In fact, I usually focus on the jig weight as the primary
means to get the desired fall speed. I typically use variation in
the body length, bulk and tail as the means to give me the
trailer size and action that appeals to the mood of the fish on
any given day. Once I get a feel for the size of body and tail
that the fish seem to be eating best, then I will calibrate the
fall speed by using heavier or lighter jig heads while keeping
constant the body/tail size that seems to appeal most to the fish
at any given moment.
Typically the series 15 tail is used for large
numbers of small fish. The series 16 tail will catch fewer
numbers of small fish, but a larger average size of fish from two
to four pounds. The series 12 tail is best for bigger
"kicker" fish and also best for flipping into
tail-tearing cover. You see, the series 12 is extra-fortified
with a wad of thicker plastic at the juncture where the legs meet
the body. So the 12 tails tear less in grabby cover. The 17
trailer works best for the biggest bass of all, and it's a great
night time trailer.
As we already discussed in Chapter 1, you can
pare back the curved sickle-shaped tips of the legs to match the
moods of the fish, and you can see some photos of trimmed tails
there. Some days, bass desire lots of action from the tails.
Other days they may only want a very subtle flapping action. As
you experiment with trimming the tails, better to trim little by
little instead of too much. As you trim down the double tail
trailer, you can get any gradient of action you want from
"double twisty" (uncut) to perfectly flat/straight
(fully-trimmed). The best action can often be somewhere in
between - and only gotten by careful trimming that will still
leave some stifled flappin' action. As you look at the tails in
the photos, try to envision different ways to trim their action.
You will quickly realize that there are an infinite number of
cutting angles - the ways you can trim are only limited by your
imagination. Some days, it may not matter at all. Some days it
may matter a lot! Just keep it in mind.
Keys to Your Jig Fishing
Success
Chapter 4
Skirts
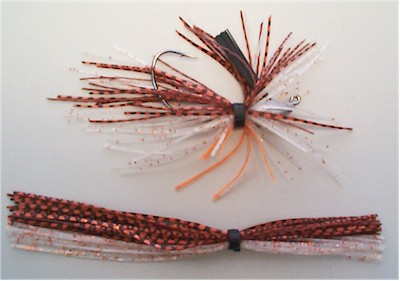 Skirt
Types Skirt
Types
Flat Silicone: The best features of
silicone are the attractive color patterns that can be combined
into a skirt. Silicone can be made in many hues of the rainbow.
It can be made opaque, clear or translucent...with a living
pearlescent sheen... with any colors of fine or coarse metallic
flecks...with laminated cross-hatchings to resemble scales or
barred baitfish patterns. An ardent tackle tinkerer can
blend any or all varieties of the above in longer or shorter
lengths to customize a silicone skirt that rivals the realistic
appearance of a flytyer's hand-tied streamers! As for commercial
manufacturers, most produce basic stock colors for
jigs...typically dark and drab...plus a few special patterns
uniquely of their own design! It's worth it to do a little
homework to compare and contrast the unique concoctions of
silicone patterns across several manufacturers, in retail stores
and mail order catalogs. You just may find that special pattern
that's particularly appealing to the fish in your local waters!
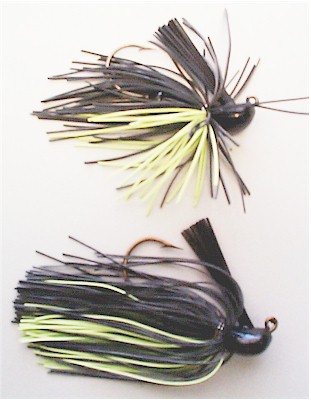 Silicone
skirts are usually held together using elastic neoprene bands to
keep the flattened strands gripped tightly in place on the jig
collar. Neoprene bands offer the flexibility to remove and change
silicone skirts from one jig to another. Silicone
skirts are usually held together using elastic neoprene bands to
keep the flattened strands gripped tightly in place on the jig
collar. Neoprene bands offer the flexibility to remove and change
silicone skirts from one jig to another.
Rubber: Typically available in two
diameters - regular and fine hair - and usually only in solid
opaque colors. Nevertheless, many jig masters prefer rubber
because of its exorbitant movement in water. On the move, rubber
wriggles more than silicone. When it is paused, rubber springs
out as if opening an umbrella, and it waves all around even when
the jig sits motionless on bottom in front of a fickle fish.
Rubber, being slippery and squishy when wet,
usually does not stay in place under a neoprene band. Often,
rubber is wrapped with wire to tie it rather permanently in place
on a jig collar. This can be considered an advantage in that
short-striking fish cannot pull the skirt off the jig collar.
Once the skirt is pulled down, its illusion of life is lost. A
short-striker typically will not pick it back up a second time
unless the skirt stays in place in proper position.
Keys to Your Jig Fishing
Success
Chapter 5
Pork Talk
All you need to know about pork trailers
Lots of guys have been asking me about
pork frogs versus plastic lately. In fact, it seems to be a
perennial debate as to whether to use pork or plastic as jig
trailers on multi-strand rubber or silicone skirted jigs.
As for me, I do use pork, and I
do adhere to most of the pork advice given by Denny Brauer as far
as size and color. I use not only chunks on fiberguard jigs, but
also wafer thin pennant-shaped strips from Uncle Josh on hair
jigs (see Bucktail Hair
and Feather Jigs), plus I use sinuous split tail pork eels
from Uncle Josh to embellish spinnerbaits and certain soft
plastics (see The
Horror of Fishing Spider Grubs).
Pork is meat and it was alive once. Crack open a brand new jar
of pork rind and sniff it yourself. It does smell delicious. Dip
a fingertip in the juice and lightly touch it to your lips, it
does taste good. Now sniff a bag of your soft plastic trailers
and put one of them on your lip...smells like and tastes like
plastic to me, and if you have sensitive lips, it may even leave
behind a burning sensation. I wonder if plastic tastes and smells
as caustic to the fish?
Salty and juicy. When I believe
the bite is going better on pork rather than plastic trailers, I
will replace my pork trailer every 20-30 minutes because I am
convinced that the concentrated saltiness and juice coming out of
the pork is like a "burst of flavor" that fish savor.
After 20-30 minutes, I consider all the taste to be leached out,
and I put it back in the jar to reconstitute itself for the next
trip. Salt in living (or once alive) tissue is like that. It will
rebalance itself so the salt level in both the pork and the salty
solution will equalize given some time. What this means is that
ultimately your pork solution will lose salt, so get a box of
Kosher salt and add a partial teaspoon of it to your pork
solution every couple of trips. You really only need to add a few
grains of salt. It's crusty and corrosive stuff, so make
sure it only gets into the jar and it doesn't coat the jar's rim
like a Margarita glass. If it does, you're going to have salt
stains and corrosion all over your tackle box.
Whittlin' on Pork. I know a lot
of people who will trim some meat off the fatty side, slice,
dice, whittle channels in the pork belly, split the
"claws", and otherwise cut or carve up various parts of
the pork. Yes, I do use softeners like glycerin to emulsify
stubborn pork that is too thick or hard to use, but I do not
modify pork. Modifications have never resulted in more bites FOR
ME. There's so much effort that goes into fishing, and so many
other little bait modifications that I make, but the task of
slicing and dicing pork is not something I think is necessary TO
ME, Unless of course, you outfish me with it. THEN I'll be the
first one slicing and dicing when we go out together next time.
But left on my own, I'll not put a knife to my pork. This is my
modus operandi with all baits anyway...I spend so much time
fishing and preparing for fishing that I basically avoid
modifying any bait if at all possible.
What someone else says. I've just
mentioned what I DON'T do, and I've also mentioned what someone
else (Denny Brauer) has been said to do. Now, here's an original
and unusual pork set-up that I do like. I haven't seen too many
other people use it. It involves a Strike King Bo-Hawg Leech.
This is a chunk-headed, fish-shaped pennant of pork. I often use
this on lightweight fiberguard bucktails in shallow cover - but
it will work on any silicone jig as well, especially if you trim
the silicone way short. But how I like to use it is as a total
ALTERNATIVE LOOK to a standard skirted jig and chunk. So, I use
deer hair - not silicone or rubber on this specialty set-up.
White hair/white Bo-Leech or black hair/black Bo-Leech. I tie a
very short, very sparse, tightly flared bucktail - only enough to
imitate a bait's gills breathing. The chunky part of the pork
leech resembles an egg-filled sway-bellied baitfish TO ME. The
thin, tapering pennant part of the leech's tail completes the
illusion of a baitfish's fluttering tail IN MY EYES. I have no
idea if the leech's pork chunk head signals a pregnant belly to
the bass, but I do believe that bass instinctively realize that
gravid female fish are full of high energy content roe. This may
also be the reason why orange-bellied baits are successful,
because they simulate the appearance of egg clutches of some
aquatic creatures.
Why? Because pork or plastic
chunks will eventually cause you to lose something - BIG BASS.
The pork or plastic chunk will ultimately fold over your hook
point, and prevent the hookset from penetrating the maw of THE
BIG ONE. Even your heaviest flippin' stick can't drive your
sharpest hook through a pork chunk. Trust me, it will happen to
you...it's not a matter of if but when! Not so with the fat,
feisty double tail grubs. You thread them all the way up onto the
hook shank, and lock 'em on with a little shot of superglue. The
body is much more compact than the fleshy pork chunks (or plastic
pork), and the double tail grub can't get in the way when a fish
bites. The most commonly used size is 5" for largemouth on
heavier flipping jigs, and 4" for smallies on small to
medium jigs.
Anglers rarely use the bulkier
6" or 7" sizes of double tail grubs at all, but they
can effectively be pinched down to from a squat, bulky trailer.
Once pinched short, it can be threaded up onto the hook shank and
held in place with superglue...or you can also just impale it on
the hook bend like you would a pork chunk. Just slip a toothpick
into the plastic sideways ahead of the hook to help prevent bass
from tearing it off so easily. This option is not at all unlike
rigging a pork or plastic chunk, but without as much risk of
losing your bass of a lifetime because the grub body is more
compact and interferes less than a bulbous chunk during the
hookset.
On the double tails, either threaded or impaled, I rig it
"flat" for the illusion of crayfish claws or for more
"lift" as I swim the lure. Surprisingly, I also rig it
"straight up" which you will rarely see people do with
a double tail. I think it more closely imitates a wide-bodied
shad, shiner or bluegill when the double tail is rigged straight
up, and the grub body pinched down really short so the tails
barely extend past the jig skirt strands! Why not try it
yourself?
In cold water I have noticed the
active movement of the twister legs on a lure such as a double
tail grub may discourage some lethargic bass from attempting to
pursue the lure. It gives the illusion that the bait is too agile
and discourages the bass from pursuing it. In these cases, trim
back the curved sickle-shaped tips of the lure legs to produce
only a very subtle flapping action. Better to trim little by
little instead of too much. In a certain sense, you are
converting the twister tail to behave more like a plastic chunk.
When I trim down the legs of the double tail
grub trailer, I can get any gradient of action I want
from "double twisty" (uncut) to perfectly flat/straight
(fully-trimmed). However, the best cold water action is somewhere
in between - and only gotten by careful trimming that will still
leave some stifled flappin' action. If you look at the tails and
try to envision different ways to trim their action, you will
quickly realize that there are an infinite number of angles - the
way you trim is only limited by your imagination!
Pinch it short. I trim not only
the curved tails in cold water, but I also have flexibility to
pinch the body shorter too. What I mean is, I can use the 4"
BODY unpinched to get a thin 4" trailer - or I can pinch the
tip off the 5" BODY to get a wider 4" trailer - or
pinch even more off the 6" to get a bulky 4"
"pig". THEN I trim down the twister TAILS to get more
or less action out of them, okay?
|
